Kubernetes on AWS EKS
This document guides you to deploy a Kubernetes on AWS EKS for PrimeHub.
Prepare
You must have a valid AWS account with proper permissions to continue this guide.
Generate Access Key
Visiting AWS Console and IAM service page to generate your own access key.
Prepare AWS credentials
mkdir -p ~/.aws
touch ~/.aws/credentials
Edit credentials and add the content with the generated access key.
# credentials
[default]
aws_access_key_id = xxx
aws_secret_access_key = xxx
region = ap-northeast-1
Install aws-cli and eksctl on your working machine
Install awscli
brew install awscli
Install eksctl
brew tap weaveworks/tap
brew install weaveworks/tap/eksctl
eksctl version
Prepare a Domain name
Prepare your domain name and manage it by Route53; Please see Making Route 53 the DNS service for a domain that's in use for details.
Create EKS Kubernetes Cluster
Create EKS cluster by eksctl command with a proper __my_cluster_name__.
# Prepare customized data
EKS_CLUSTER_NAME=__my_cluster_name__
EKS_REGION=ap-northeast-1
EKS_ZONE=${EKS_REGION}a
K8S_VERSION=1.16

# Running eksctl to create EKS cluster
cat <<EOF >> eks-config.yaml
apiVersion: eksctl.io/v1alpha5
kind: ClusterConfig

metadata:
    # this is the name of the cluster
    name: ${EKS_CLUSTER_NAME}
    region: ${EKS_REGION}
    version: "${K8S_VERSION}"
    tags:
      # You can customize your own tags
      Name: ${EKS_CLUSTER_NAME}

vpc:
    nat:
        gateway: Disable

nodeGroups:
  - name: scaled-cpu-pool
    instanceType: m5.xlarge
    desiredCapacity: 0
    minSize: 0
    maxSize: 2
    labels:
      component: singleuser-server
      hub.jupyter.org/node-purpose: user
    taints:
      hub.jupyter.org/dedicated: "user:NoSchedule"
    iam:
      withAddonPolicies:
        autoScaler: true
        externalDNS: true
    availabilityZones: ["${EKS_ZONE}"]
    tags:
      Name: "${EKS_CLUSTER_NAME}-scaled-cpu-pool"
      cluster: "${EKS_CLUSTER_NAME}"
      k8s.io/cluster-autoscaler/node-template/label/component: singleuser-server
      k8s.io/cluster-autoscaler/node-template/taint/hub.jupyter.org/dedicated: "user:NoSchedule"
  # [Optional] For GPU node
  # - name: scaled-gpu-pool
  #   instanceType: g4dn.xlarge
  #   desiredCapacity: 0
  #   minSize: 0
  #   maxSize: 2
  #   labels:
  #     component: singleuser-server
  #     hub.jupyter.org/node-purpose: user
  #   taints:
  #     hub.jupyter.org/dedicated: "user:NoSchedule"
  #   iam:
  #     withAddonPolicies:
  #       autoScaler: true
  #       externalDNS: true
  #   availabilityZones: ["${EKS_ZONE}"]
  #   tags:
  #     Name: "${EKS_CLUSTER_NAME}-scaled-gpu-pool"
  #     cluster: "${EKS_CLUSTER_NAME}"
  #     k8s.io/cluster-autoscaler/node-template/label/component: singleuser-server
  #     k8s.io/cluster-autoscaler/node-template/taint/hub.jupyter.org/dedicated: "user:NoSchedule"

managedNodeGroups:
  - name: default-node-group
    instanceType: t3.medium
    minSize: 2
    desiredCapacity: 2
    maxSize: 3
    labels:
    iam:
      withAddonPolicies:
        autoScaler: true
        externalDNS: true
    availabilityZones: ["${EKS_ZONE}"]
    tags:
      Name: "${EKS_CLUSTER_NAME}-default-node-group"
      cluster: "${EKS_CLUSTER_NAME}"
EOF
eksctl create cluster -f eks-config.yaml
Wait until EKS cluster is created, then check the cluster.
eksctl get cluster
Update kube-config with the newly created cluster info.
aws eks update-kubeconfig --name ${EKS_CLUSTER_NAME} --alias ${EKS_CLUSTER_NAME}
Try to get nodes to verify the added kubeconfig:
kubectl get nodes
Output
NAME                                                STATUS   ROLES    AGE   VERSION
ip-192-168-2-53.ap-northeast-1.compute.internal     Ready       21s   v1.15.10-eks-bac369
ip-192-168-74-187.ap-northeast-1.compute.internal   Ready       21s   v1.15.10-eks-bac369
Install helm
Install helm 3.x.x+ binary. Please see the installation steps in prerequisites. (we recommend Helm 3 for the installation.)
Verify
helm version
Output
version.BuildInfo{Version:"v3.2.4", GitCommit:"0ad800ef43d3b826f31a5ad8dfbb4fe05d143688", GitTreeState:"clean", GoVersion:"go1.13.12"}
Nginx Ingress
Add Chart repo
helm repo add ingress-nginx https://kubernetes.github.io/ingress-nginx
helm repo update
Helm install
cat <<EOF > nginx-ingress-config.yaml
---
controller:
  containerPort:
    http: 80
    https: 443
  service:
    targetPorts:
      http: http
      https: https
    annotations:
      service.beta.kubernetes.io/aws-load-balancer-backend-protocol: "tcp"
      service.beta.kubernetes.io/aws-load-balancer-type: "nlb"
EOF

helm install nginx-ingress ingress-nginx/ingress-nginx \
    --create-namespace \
    --namespace ingress-nginx \
    --values nginx-ingress-config.yaml
Find the EXTERNAL-IP
kubectl get svc -n ingress-nginx
Output
NAME                               TYPE           CLUSTER-IP       EXTERNAL-IP                                                                          PORT(S)                      AGE
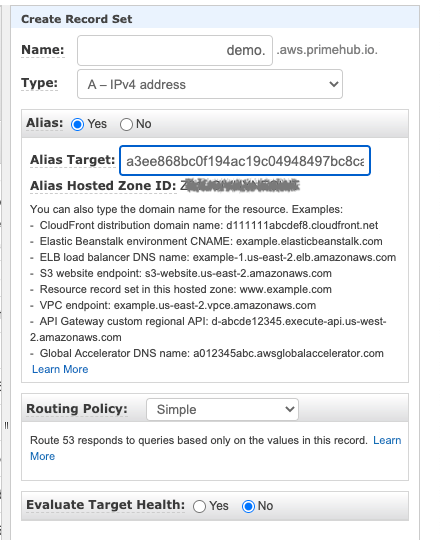
nginx-ingress-controller           LoadBalancer   10.100.253.162   a3ee868bc0f194ac19c04948497bc8ca-a179fb405d10a39f.elb.ap-northeast-1.amazonaws.com   80:31938/TCP,443:30853/TCP   21d
nginx-ingress-controller-metrics   ClusterIP      10.100.146.39                                                                                   9913/TCP                     21d
nginx-ingress-default-backend      ClusterIP      10.100.49.194                                                                                   80/TCP                       21d
Go to AWS web console Route53 page and add a Type A record for your domain with alias name.

Verify By Your Domain
Query nginx-ingress with your own domain:
curl http://<your-own-domain>
The output will be 404, because nobody defines any Ingress resources:
default backend - 404
Enable Cluster Autoscaler
AWS EKS will use cluster-autoscaler to handle auto scaling. For detail information, please reference the following URL. (https://docs.aws.amazon.com/eks/latest/userguide/cluster-autoscaler.html)
Deploy the Cluster Autoscaler
To deploy the customized Cluster Autoscaler with the following commands.
EKS_CLUSTER_NAME=__my_cluster_name__
curl https://raw.githubusercontent.com/InfuseAI/primehub-site/master/docs/assets/cluster-autoscaler-autodiscover.yaml.tmpl | sed -e "s/{EKS_CLUSTER_NAME}/$EKS_CLUSTER_NAME/" | kubectl apply -f -
View your Cluster Autoscaler logs
After you have deployed the Cluster Autoscaler, you can view the logs and verify that it is monitoring your cluster load.
View your Cluster Autoscaler logs with the following command.
kubectl -n kube-system logs -f deployment.apps/cluster-autoscaler
[Optional] Cert Mananger
If you want to enable Https on your cluster, you can use cert manager to request free certificate from Let's Encrypt.
Deploy Cert Manager
helm install \
  cert-manager \
  jetstack/cert-manager \
  --create-namespace \
  --namespace cert-manager \
  --version v0.15.0 \
  --set installCRDs=true \
  --set ingressShim.defaultIssuerName=letsencrypt-prod \
  --set ingressShim.defaultIssuerKind=ClusterIssuer
kubectl -n cert-manager rollout status Deployment/cert-manager-webhook
Apply Cluster Issuer
kubectl apply -f - << EOF
apiVersion: cert-manager.io/v1alpha2
kind: ClusterIssuer
metadata:
  name: letsencrypt-prod
spec:
  acme:
    email: phadmin@<Your-Domain>
    server: https://acme-v02.api.letsencrypt.org/directory
    privateKeySecretRef:
      # Secret resource used to store the account's private key.
      name: letsencrypt
    # Add a single challenge solver, HTTP01 using nginx
    solvers:
    - http01:
        ingress:
          class: nginx
EOF
Next - Setup PrimeHub
Prepare PrimeHub Config for auto scaling
Please put primehub.yaml under the following path ~/.primehub/config/<cluster-name>/helm_override/primehub.yaml
EKS_CLUSTER_NAME=__my_cluster_name__
mkdir -p ~/.primehub/config/${EKS_CLUSTER_NAME}/helm_override/
touch ~/.primehub/config/${EKS_CLUSTER_NAME}/helm_override/primehub.yaml
primehub.yaml
---
jupyterhub:
  scheduling:
    userScheduler:
      enabled: true
      image:
        tag: v1.16.8
    podPriority:
      enabled: true
    userPlaceholder:
      enabled: false
    userPods:
      nodeAffinity:
        matchNodePurpose: require
Install PrimeHub
Now a Kubernetes-ready EKS is ready for PrimeHub installation. Next, install PrimeHub CE or PrimeHub EE.
After PrimeHub Installed
Please apply the following command to fix rbac issue of primehub-user-scheduler
cat << EOF > primehub-user-scheduler-complementary.patch.yaml
- apiGroups:
  - ""
  resources:
  - persistentvolume
  - persistentvolumeclaims
  verbs:
  - update
EOF
kubectl apply -f <(cat <(kubectl get clusterrole primehub-user-scheduler-complementary -o yaml) primehub-user-scheduler-complementary.patch.yaml)